<< Back to Portfolio

A turn-of-the-last-century house in La Center Washington. Yep, that is like 113 years old. Old enough to have had its windows upgraded a time or two.

What began as a window-sash replacement job (those are Andersen brand windows), turned into a water-remediation job when the repair of several window sills required that the window jamb assemblies be removed.

Upon removing the jamb assemblies, it was discovered that the rough-opening components beneath the windows were also damaged.

This led to the removal of some of the siding beneath said window openings which led to the discovery of extensive wall damage. This job went on for weeks as we made our way around the house opening and closing exterior walls.

As anybody who works construction in the great Pacific Northwest knows, you have to be prepared for any contingency related to the weather.

If you click on the photo, you may be able to see the water stains on the plywood sheathing that corresponds with the vertical sides of the window opening. And no, the black Grace Vycor flashing membrane was not beneath the exterior trim when we removed it. That is something which we installed before this photo was taken.

And then, upon removing the plywood, we frequently discovered that the structural components were damaged as well. Again, if you click on the photo, you may be able to see the dark-brown and black wall-studs, indicating an advanced state of decay. And that white stuff? That is mold.

We are CSI Portland/Vancouver. Construction Scene Investigators. But instead of following the money, its follow the water stains.

And if you click on the photo, you can tell by the expression on David Castros face, that he takes his job in construction forensics very seriously.

O.K., but seriously, the science behind the proper application of exterior envelopes is not rocket-science, which is the real crime behind that which leads to the wanton destruction of folks exterior walls.

Our first trip to this handsome structure in Jefferson Oregon was in 2010, just two years after the home was built.

I think this is called Stucco Veneer/Reinforced Concrete Block type construction. Aka as CMU or CBS Construction.

Four years later, after receiving a bid from us to reinstall the windows & exhausting the litigation process in pursuit of the now defunct builder, our client had us back to fix the problem. Notice the lawn that now exists. Starting here with the Master Bedroom, we removed one large mulled Marvin wood-clad assembly and two smaller crank-out casement windows around the corner…

…to discover some of the likely reasons these windows leaked. They did not possess the stereotypical backer-rod and caulking joint around the top & sides at the exterior. And the back-dam of the sill-pans were flattened for some reason. Also, the side-dams were not sealed to the vertical rough-openings in any manner. And of course, the corner seams between the side & back dams were not sealed.

Add to that, the sills had a rake to towards the interior. If you enlarge the photo above by clicking on it, you may be able to make out the bubble in the torpedo level indicating this condition.

All three openings had to be chiseled back to allow us to achieve a good half-inch space between the masonry structure and the window assemblies to allow the proper installation of backer-rod & caulking for the top & sides.

These spaces around the window assemblies were originally covered with a rigid copper barrier that was held in place by being inserted into a kerf in the masonry wall, but was not properly sealed to the window jambs, allowing wind-driven moisture to find access.

The new sill pans we designed are put in place.

Working with our client, she approved our idea to cover the masonry sills entirely. These seams between the various sill-segments (see above) also drew suspicion of possibly allowing water-penetration.

After the windows were reinstalled, the exterior receives another top-coat of masonry stucco.

Condos on the Columbia River, immediately northwest of the Portland Airport.

The backside of one particular condo that is being readied for sale.

Our client has noticed that some of the window trim is looking a little the worse for wear.

Not too surprising. The water has been getting in through or around the trim. Note that the moisture barrier is not even touching the window, let alone properly flashed to it. And thus please note the water damaged sheathing. See the dark stains? You may enlarge the photo by clicking on it.

And so, what began as a simple exterior trim replacement job has suddenly grown into a full-fledged water damage remediation project.

More exterior trim and siding removal confirms that the lapses in proper flashing technique is systemic. Time to get the ladder-jacks out and work our way up the wall.

Much of the sheathing is in need of replacement.

And some of it was so deteriorated that water was accessing the wall cavities, damaging the structural wall components. Enlarge the photo to get a good view of it.

Of course you know, and we know that this entire structure was buttoned up by the same folks who did this one condo. The longer they wait to check it and get it properly flashed, the worse the damage will be.

Instead of thousands of dollars, it will be tens of thousands of dollars in repairs. Above, our technicians are just finishing the clean-up at the end of a productive day. Tomorrow, the exterior trim and the new Hardiplank siding will begin to be installed.

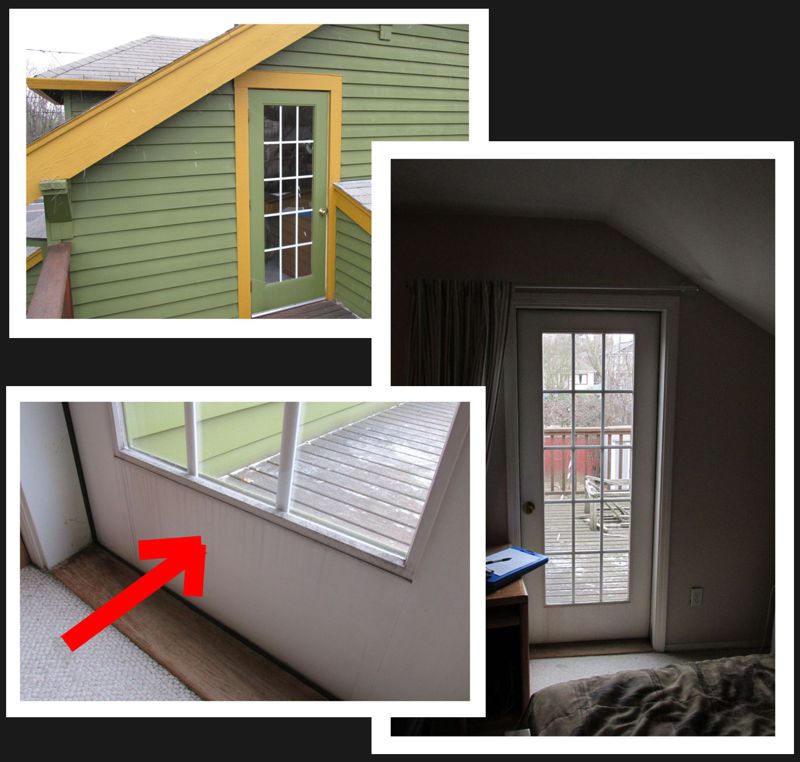
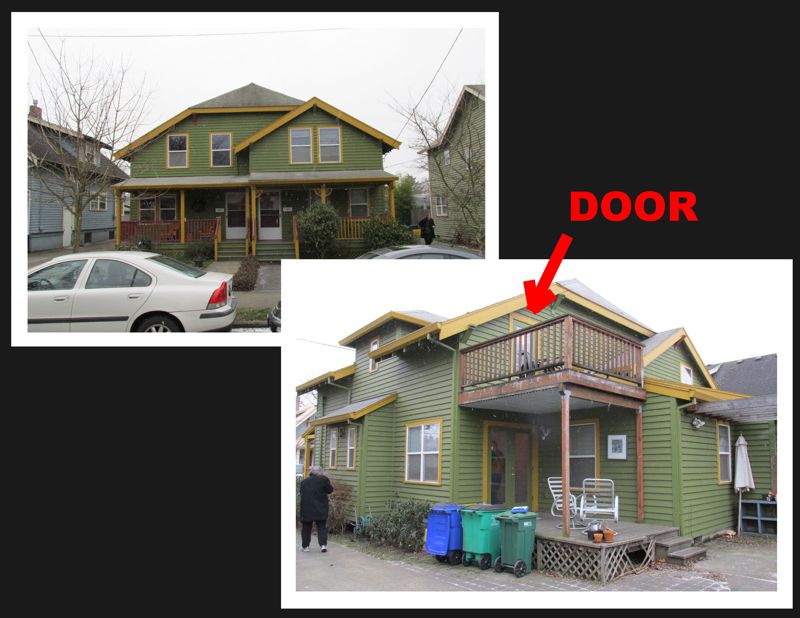
A remodeled turn of the last century house. Our client knows they need a new door because it is leaking like sieve on the interior side of the door panel…

…around the bottom of the glass (red arrow). If you click & enlarge the photo collage, you may be able to see the water stains.

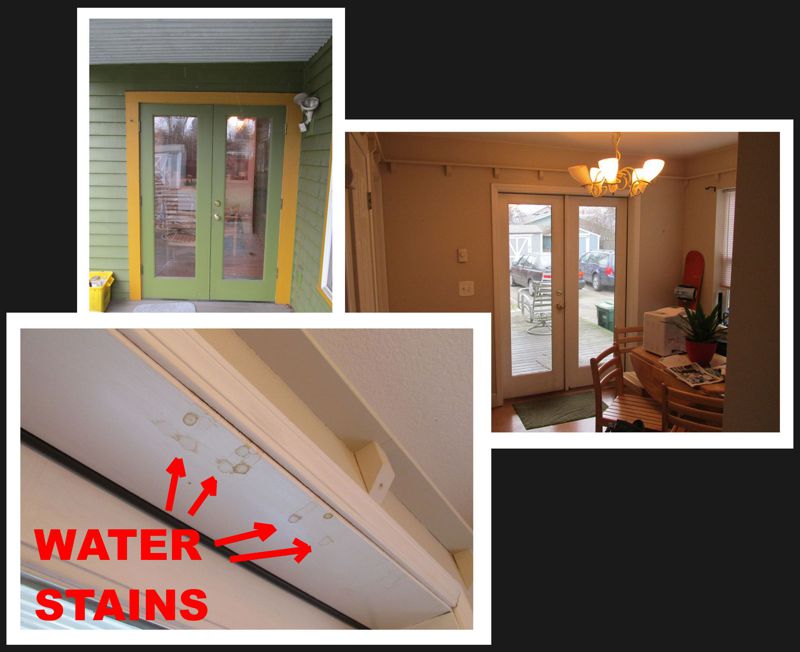
They know it’s a fairly serious issue, because of the water-stains showing up at the top of the double-entry door jamb directly below on the ground floor. But it’s not (of course) until we execute some investigative procedures (removing siding) that anyone realizes the damage in…

…the wall above double-entry doors. On a side note, you might notice the metal Z-flashing & the moisture barrier? See something wrong? Not that it would have prevented the water that got in the wall above, even if it had been done correctly, but it tends to reflect the lack of expertise that is so prevalent that leads to this type of damage.

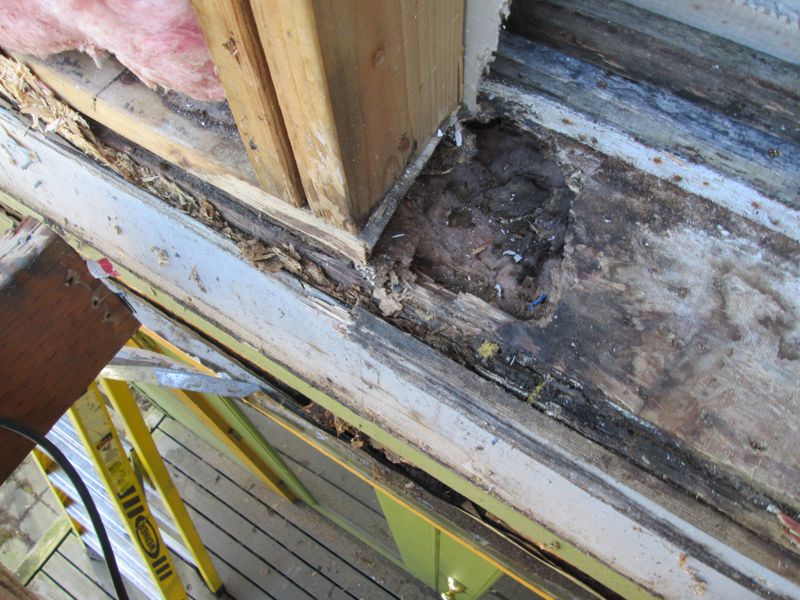
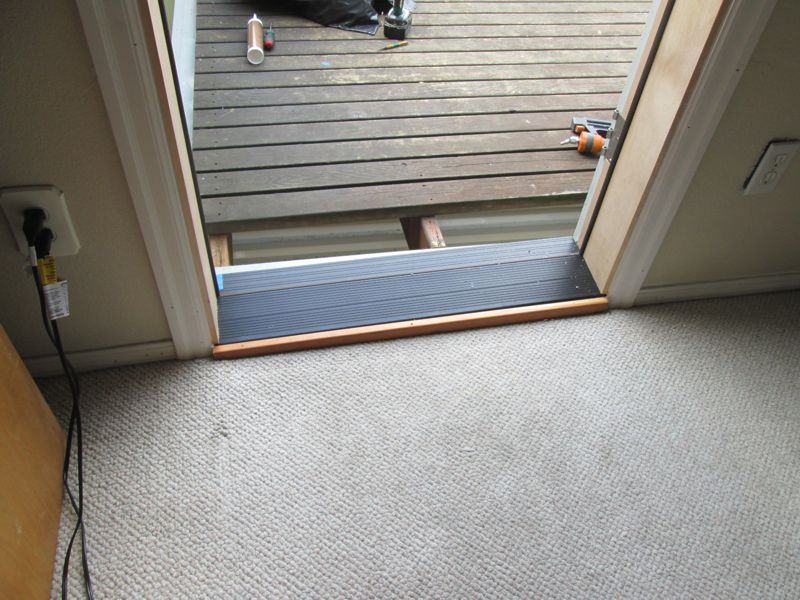
Here we see the damage to the rough-opening components directly below the sill of the 2nd story deck door which we discovered after we removed the door assembly.

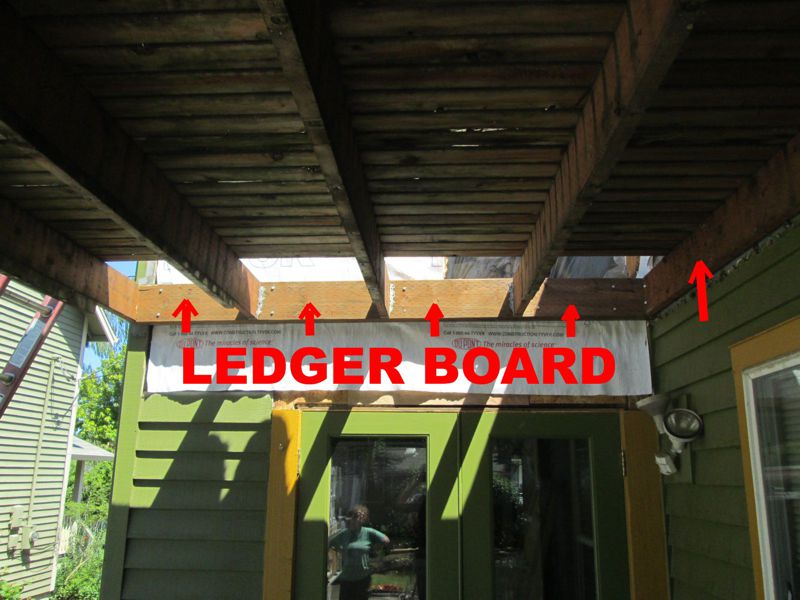
As it turns out, the problem at hand is much more than the door assembly alone. The ledger-board that fastens the deck to the exterior wall was never properly flashed. So at our client’s request, we removed it, repaired the wall, and then installed a new ledger board.

Back up on the deck, looking down at where the deck fastens to the wall just below the single-entry door opening here, you can see the metal L-Flashing we will install before installing the new door or replacing the siding or the decking we’ve removed.

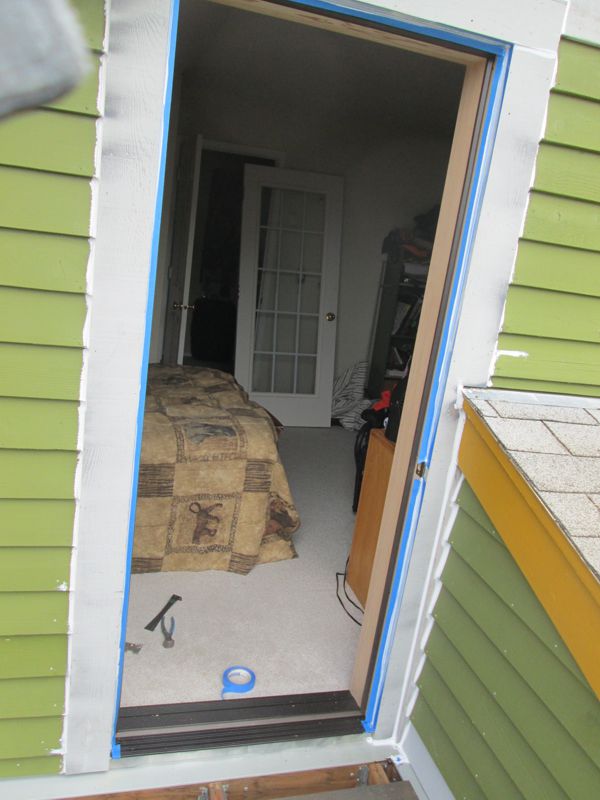
All water damaged components are replaced and the new door jamb is installed after the rough-opening is properly sealed with the latest flashing products, including a sill-pan that runs out to the…

…exterior and overlaps that L-Flashing we installed, as does the siding and the moisture-barrier we’ve modified.

If you enlarge the photo, you may be able to make out the siding we replaced above the upper deck door (and the double-doors below), that facilitated our properly tying the metal header flashing into the moisture barrier above. No more water in the walls.

Tabor Park Condominiums in S.E. Portland.

At some point in history, this building was re-sided with Vinyl Siding…

…and Vinyl Windows replaced the original aluminum-framed windows…

…the original frames of which were left in place with the Vinyl windows installed right over the top.

What if it begins to rain with the window removed? No problem. It’s all part of our skill set.

After having removed the Vinyl Window, technician Sean Miller removes the aluminum frame…

…and sets it aside to allow…

…for the proper flashing of the rough-opening.

After which Phil McNair applies a bead of caulking before re-installing the frames. If you click on the photo, it will enlarge for a better view.

Another problem solved.

North of the Sunset Corridor, AKA north of the Sunset Highway, AKA as N.W. Portland.

A glass block picture window.

A very nice (in our opinion) accent of “light” for what could have easily been a dark stairwell.

Plenty of light while maintaining privacy.

I can say that I have been alive long enough to say that I have seen the appeal of glass block come and go and then come back again.

Ebb and flow, wan and grow, glass-block may be a classic for the lovers of glass and light for generations to come. If you enlarge the photo by clicking on it, you may be able to see the swollen sill-board that resulted in the call to our business.

An exterior examination on a ladder reveals water-weary wooden brick-moulding and a heavy caulking-bead (or something) whose effectiveness has long since passed.

And so it is that we are contracted to make reparations to the exterior seal around this opening.

Upon removing the original exterior trim, we see a layer of foam insulation around the glass that shows signs of excessive exposure to moisture at the bottom of the opening.

We remove any water damaged components, replacing them as needed, and reseal the block structure with commercial-grade sealants and “composite” exterior trim. Easy peasy.

An older Lake Oswego home with board and batten siding, single-pane wood windows and lath & plaster interior walls.

Our client informs us that water is showing up around the interior side of this front facing living room window assembly.

Inspecting the interior side, we discover that the location of the water seems to correlate with the vertical mull-post between window sash. Upon checking the other mull-post, we discover a similar condition.

This pattern would suggest water penetration from above, so we step back outside and take a look above.

This is one of about four or five vertical splits in the siding boards that have been channeling moisture down upon the top of the window header-jamb when the wind blows the rain just right.

And so, upon acceptance of our proposal, we return and remove the board and batten siding above this window assembly.

This photo typifies one of our ad hoc shops we set up on site to facilitate our repairs. If you click on the photo, it will enlarge a bit.

Tim & Juan are hard at it, reinstalling the siding after properly flashing the top of the window and applying the moisture-barrier.

The finished product. Better than new.

We repaired the interior wall surfaces as well.

Mixed use property in Southeast Portland, just east of the Mount Tabor area.

Very creative. Business space below out on the street,…

…and living space above on the backside accessed via a common drive or alleyway.

Water is showing up at the top of the main-floor vinyl patio door opening that leads out to the deck.

Can you see the water stains on the drywall and the vinyl door frame?

Anybody who does what we do for a living, learns pretty quickly to suspect an upper window when water shows up like that.

Upon close examination, a crack in the upper window frame is discovered in the bottom corner. It may be hard to see in this photo because someone has tried to fill it with white caulking.

The caulking will only work for so long, if at all…in large part due to the fact that vinyl expands and contracts so much, that the patch will usually be pulled away.
Fortunately, we are experts at repairing vinyl windows,…

…which is a fact that seems to spur considerable surprise to many a folk. Above, we are shown removing and replacing all the water damaged wall components, and we also provide and install a “window-pan” under the vinyl window in the…

…event that something should cause the window to leak again someday. On a side note, caulking should never be considered an adequate last or only barrier between exterior moisture and the structural components in your exterior walls.

A modest home in Tigard with Vinyl siding & Vinyl Windows.

Should be low maintenance.

But the design and application of the wood trim around this front facing living room window could have used a little more thought.

The insulated glass in the half-round transom window has failed, so we remove it for use as a template to acquire the replacement glass.

Removal of the lower shelf unit, and then the siding, and then the sheathing reveals more and more damage to this lower wall. If you click on the photo, it will enlarge a bit.

Vinyl Siding and Vinyl Windows failed to forestall the potential effects of Willamette Valley weather.

And the culprit is very simply a lack of proper flashing technique and application.

This project was a nice respite from all the extension-ladder, pump-jack, scaffold or man-lift work so much of the water remediation work entails.

We used Hardiboard material in lieu of the plywood product previously employed. The new glass is installed.

The new decorative shelf is installed, and we’re good to go.

Yeah, I chose this photo because I liked the sun-flares. And yet the photo serves to illustrate which side of the house receives the sun and the rain-storms that blow in from the southwest off the ocean.

The back side. With very little protection for the windows in the form of an overhang, as has been common since world war two. I am told that it began due to the rationing of building materials related to the war effort, but I surmise that it eventually became the practice of some builders caring more for their bottom-line than the quality of their product.

Behind our client’s sheet of black-plastic is the family room window where the water is showing up at the top. You may enlarge the photo by clicking on it. Note the containers and towels on the window sill to catch the water.

It didn’t take long to trace the water trail to the source beneath the 2nd story window above. This photo is showing that trail coming down to the top of the family room window which we’ve temporarily removed.

The damaged sheathing is replaced and the window is reinstalled.

Our client demonstrates the rare wisdom of concluding that poor flashing practices on one portion of this exterior wall likely means poor flashing practices elsewhere…

…on this wall with the severe exposure. And so it is determined to replace all the moisture-barrier,…

…and all the Hardiplank siding on this one wall.

Having criticized the lack of a substantial overhang (eves), it should be stated here once again..

…that if the moisture barrier and all related surfaces and components were properly flashed beneath the siding, there would be no water leaks, with or without eves.